The repository of tabletop gaming retailers

I found this on Facebook at the weekend and thought that this site deserves a bit more attention This site attempts to provide a directory of all online tabletop gaming websites in one easy to navigate location. Look for yourself: The Repository

You can search the repository for tags like figure scale, manufacturer, topic etc. It is very recommended. Alas as it is very new there are still a lot of entries missing. The people behind this site therefore ask for help in developing the repository further.


Trees and Shrubs

This weekend I started doing some trees and shrubs for my tabletop terrain.

What you need to build the trees and shrubs is some big enough nails, metal wool ( for sanding / use the finest you can get), cheap oregano ( it doesn’t have to taste good !) at least 500 g for 10 trees and ten shrubs, a hot glue gun, an airbrush or a black and a green spray can, spray glue, paper beer mats and a well ventilated workspace.

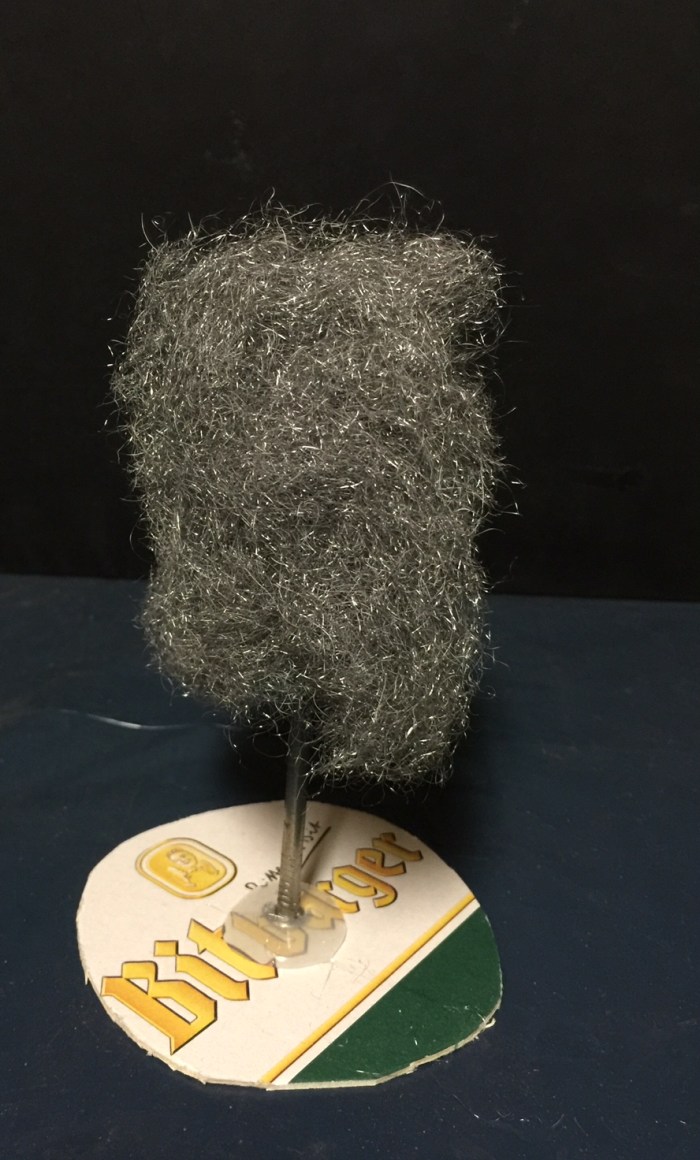
So now what I did  with all this. First I cut out oval or round discs out of the paper beer mats. These will be the bases of the trees/shrub. Then I took a nail and glued it with the hot glue gun to the beer mat like so:

FullSizeRender

Then I cut of a piece of the metal wool ( use a pair of old scissors for this as they won’t be sharp afterwards) and shaped it into a tree form. Thereafter put some hot glue on the top of the nail and slip the metal wool over the nail. Be careful not to burn your fingers.

FullSizeRender 2

The shrubs were made by hot gluing the metal wool directly to the beer mat.

FullSizeRender 3

You could use different sizes of nails to do different trees I only had one size of nails at hand.

The next step is spraying the whole tree/shrub black. I used an airbrush you can use a spray can of course anyway be sure to have a well ventilated area to work in. Next you spray the tree/shrub with spray glue (wait for the black paint to dry first) and put a generous amount of oregano over the tree/shrub. Leave that to dry over night and buy yourself a pizza because you will be very hungry when the house smells of oregano 🙂

Once dry shake of the oregano excess and spray the tree in green color. Let that dry and give the beer mat a good covering of fine and coarse sand like you do with the rest of the scenery you have . You should have something like this then:

FullSizeRender 5

In this picture the sand on the base is still missing. I will post more pictures when the trees are finished.


The Completed Avenger!

The Avenger Strike Fighter is completed. Here are the pictures of the model. I will right up a complete article with all the steps from the beginning to completion of the Avenger on the Airbrush painting page. So here are the pictures:

FullSizeRender 9

If you like what you see feel free to leave a comment!

And here is the start of a new Lannister bowmen unit

I didn’t like to paint always the same colors on 12 figures in a row. Therefore I started two units a Stark and a Lannister one so that I can switch between them.

So here is the first Lannister Bowman. A strait build out of a few Perry plastic WotR boxes:

FullSizeRender

FullSizeRender 2

The long Grass Tufts were made with my flock box again

A new Stark Bowmen unit

When I was at Crisis in Antwerp in November I got one of the new boxes of plastic bowmen by Conquest games.

conquest

The figures are quite nice but it is very difficult to build them in a way that they look like shooting an arrow correctly. Normally the arrow arm is lifted up to the ear when you draw a bow ( I am an sports archer myself) but this is not really achievable with these minis. Anyway I gave them a try and started to build and paint a 12 men bow unit for my Stark Army ( for Dragon Rampant).

Here is the first bowman:

FullSizeRender

FullSizeRender 3

This is a strait build from the box except the hood which was added with some greenstuff. The grass tufts were made with the flock box I got for xmas. You can see a review on the terrain page.

More during the next days.


The nearly finished Avenger

Here are Pictures of the upper side of the Avenger Strike Fighter. My son wanted the model to appear very used and dirty. So I had to use quite a lot of pigments to achieve this look. As the army is based on a red planet like Mars the dirt had to be red in tone . Here is what it looks like now after pigments and several coats of varnish as fixative for the pigments as it is, after all, a gaming model:

FullSizeRender 37


Next will be the bottom of the plane and the windows of the cockpit then it is finished. Fell free to leave a comment if you like.


I did a bit more work on my sons Avenger

The first thing I did was to remove all the masking tape and newspaper. This is always a very exciting step as you see the color combination you chose for the first time. Look for yourself:

FullSizeRender 17

The next steps are done with a brush again. I blocked in all the other colors like on the Lenses:

The engines:

The armament:

Then I started the aging and weathering step by painting in Scratches . This step isn’t finished yet as the number I on the fuselage is still missing (remember this Avenger is red I).

This is what it look like at the moment. A lot more to do before it is finished! Watch this space for coming updates!

FullSizeRender 34


News from Westfalia miniatures

Westfalia just wrote on their facebook page that there will be more halfmen and even a game published by them together with Dan Meresy

Here is some concept art

image

Hope you like what you see !

Avenger next step

The next step was to mask of all areas on the model which have to stay grey, as the next painting step is to airbrush all parts which get another color, like the wings , fuselage and wingtips.

The wings will be dark blue as that is the main color of my sons adeptus mechanicus army as will the fuselage. The wing tips will be red as a squadron designation ( like in Star Wars red I or redII etc).

This afternoon I will unmask the complete model again and begin to paint the engines and all the other detail like Guns and rockets. After that filtering and weathering will commence .


Avenger Strike Fighter

I started painting an Avenger Strike Fighter for my Son. He does’t like to paint with an airbrush so I have to do that for him. He started to paint the model a while ago by base coating it black. Now it has collected so much dust that I had to clean it first.

On to the model:

The Avenger is a dedicated strike fighter, intended to conduct high-speed, low-level attacks on ground targets, with armoured vehicle formations and high-value strategic assets such as munitions dumps forming its principal prey. The Avenger Strike Fighter boasts firepower that exceeds most other Imperial aircraft of its size, and its particular reputation as a tank-killer is due to the Avenger bolt cannon it carries.

I have to paint it so that it fits to my sons Adeptus Mechanicus army. Pictures of the army will follow once the Avenger is completed.

Here are pictures showing the masking of the cockpit windows:

On the right picture you can see how I applied the masking tape. I cut the shape of the window out of the masking Tape with a very sharp scalpel blade fig. 11.

The first step was then applying a black new undercoat after dusting the model:

In the pictures the undercoat isn’t dry yet but you can see at the tail of the plane that it will be matt after drying.

Next step was to apply primary highlights by applying white to the parts which have to be highlighted later. I forgot to take a picture of the top side of the Avenger sorry:

FullSizeRender 4

FullSizeRender 3

After drying time I applied a very thin coat of Vallejo neutral grey ( the base color of the plane):

FullSizeRender

FullSizeRender 2

Thats all I did for now. I will show more when I did a little bit more work on it.