A campaign map with TSS tiles

I own a lot of TSS 2′ square terrain tiles for my wargaming table. I wanted to use these for a campaignn system,too. So I thought about a way of cataloging and using the tiles electronically .

As I am not that good with computer graphics but use powerpoint a lot, I used that program for my needs.

The TSS tiles are 3D modular Styrofoam boards with rivers tracks etc on them. I bought quite a lot a few years ago but certain typs are still missing , wich I will build myself in the future ( expect to see a how too later).

So here is a screenshot from the tiles I did with powerpoint:

Tiles

Top row just plain grasslandd, then hill contours ,roads/tracks, build up areas(to place buildings on, River tiles, Coastline and open water and last my castle .

Next I did some overlays :

Overlays


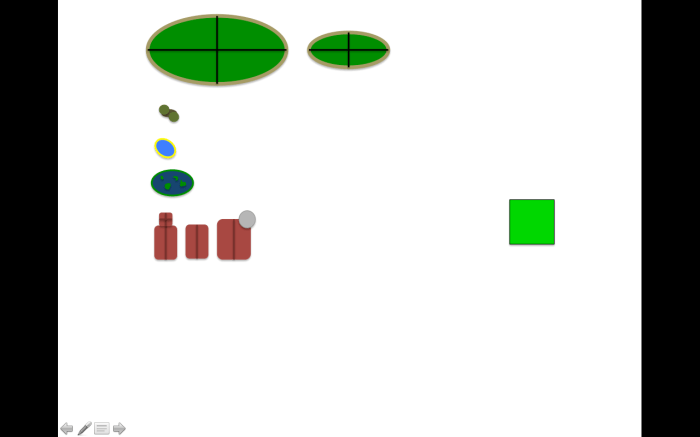
two 4 part hills, trees, a pond, a swamp, a church, a house, a manor house .

I will add other overlays and tiles when I actually have build them for my gaming table.

Here is a sample map I did with the tiles:

Beispiel2

So when two armies meet on this campaign map ( which in this case is very small I know) it is very easy now for me to translate that onto my gaming table. The only thing I have to figure out is how to calculate movement on the campaign map in relation to movement on the table. If you have an idea please post it here!!!

The red area is the amount of tiles fitting on my gaming table ( 4×7 tiles). This red rectangular can be moved and turned around so that you exactly know what the table has to look like. Here are two more examples:

When I do more I will show the progress here . I hope this might be useful for you. I think with this approach it makes much more sense to fight for a bridge or a hamlet then just fight one of battles.

Trees and Shrubs

This weekend I started doing some trees and shrubs for my tabletop terrain.

What you need to build the trees and shrubs is some big enough nails, metal wool ( for sanding / use the finest you can get), cheap oregano ( it doesn’t have to taste good !) at least 500 g for 10 trees and ten shrubs, a hot glue gun, an airbrush or a black and a green spray can, spray glue, paper beer mats and a well ventilated workspace.

So now what I did  with all this. First I cut out oval or round discs out of the paper beer mats. These will be the bases of the trees/shrub. Then I took a nail and glued it with the hot glue gun to the beer mat like so:

FullSizeRender

Then I cut of a piece of the metal wool ( use a pair of old scissors for this as they won’t be sharp afterwards) and shaped it into a tree form. Thereafter put some hot glue on the top of the nail and slip the metal wool over the nail. Be careful not to burn your fingers.

FullSizeRender 2

The shrubs were made by hot gluing the metal wool directly to the beer mat.

FullSizeRender 3

You could use different sizes of nails to do different trees I only had one size of nails at hand.

The next step is spraying the whole tree/shrub black. I used an airbrush you can use a spray can of course anyway be sure to have a well ventilated area to work in. Next you spray the tree/shrub with spray glue (wait for the black paint to dry first) and put a generous amount of oregano over the tree/shrub. Leave that to dry over night and buy yourself a pizza because you will be very hungry when the house smells of oregano 🙂

Once dry shake of the oregano excess and spray the tree in green color. Let that dry and give the beer mat a good covering of fine and coarse sand like you do with the rest of the scenery you have . You should have something like this then:

FullSizeRender 5

In this picture the sand on the base is still missing. I will post more pictures when the trees are finished.


New Book

Battlefields in Miniature

Making realistic and effective terrain for Wargames

by Paul Davies

IMG_4817

Like a good General a good warmer should have an eye for the ground. Just as nature plays an imported role in real battles it also does this on the tabletop.

When you spend a lot of time painting your miniatures you should also spend time on building good wargames terrain.

This book helps immensely to fulfill this task.

In the different Chapters everything you need to know about terrain building is explained.

The book starts with showing which different possibilities there are to create terrain like Terrain cloths, Terrain tiles, custom or sculpted terrain.

In the following chapters Davies explains how to build Rivers and Ponds Islands Cliffs and Hills, Trees, Walls, Fences and Screens, Hedges, Gates, Cultivated Fields, Roads, Bridges, Defense and  Buildings.

The book is well worth reading and helps building terrain.

It is useful for beginners and old hands alike.

Highly recommended

FullSizeRender

sample page.

New terrain page

I added a new terrain page. I think good looking convincing terrain is as important as well painted miniatures for a eye candy wargame.

I started out with an MDF house in 28mm by timeline. You can see more here

IMG_2013 IMG_2014